I came across the Nikko Microkite by chance on YouTube. Someone had bought it cheaply on a market car boot sale and was impressed with how it
flew so he posted that video on Youtube (http://www.youtube.com/watch?v=s92-8jL-PUg).
I bought one from E-bay and it flew fine at first but I soon got finger cramp because of the pistol-grip transmitter that it came with (I am
used to joysticks only!).
Also the 7.2V 1300 mAh NiCd battery came with it ran flat after 5 minutes.
At first I just replaced the battery with a 7.4 v (2S) LiPo battery after a fw minutes with that the (cheap, brushed) motor burnt out !
Time for a radical rethink....
Because it showed so much promise while flying I decided it was worth investing some money to make this into proper RC vehicle. It needed :
- a proper 2.4 GHz receiver, so that I can fly it with my normal (joystick) transmitter (£8 DSM2 compatible)
- a better battery -> LiPo 7.4V (2S) 1300 mAh or similar (£4)
- a better motor -> Blue Wonder micro brushless, 1700 kV (£7)
- a propeller to fit the new motor, 8 x 6 slow fly -> (£0.60 + £0.50 for a prop saver/adapter)
- a brushless motor speed controller, approx 10A (£8)
- a replacement servo : TowerPro SG5010 (£4)
Total upgrade cost : just over £32, which is twice what the whole original cost me !.
Was it worth it ? Absolutely. You might get a few hours flying/enjoyment out of the original setup for your £15 before it breaks down.
Since the upgrade I've probably had over 20 flights with it, lasting between 30 mins and 1 hour each, and it will last many, many flights more.
Here's how I did the upgrade :
| First I removed all screws that are holding both halves of the microkite together, and removed the old motor, receiver and battery.
Then I carefully glued in the motor with superglue. It is only glued at the bottom half of the grey ring that you see here so it is quite fragile at this stage. That grey ring is a leftover insert from a propeller that just happened to be the right size for this motor. The prop saver/adapter is already fitted to the shaft of the motor. |
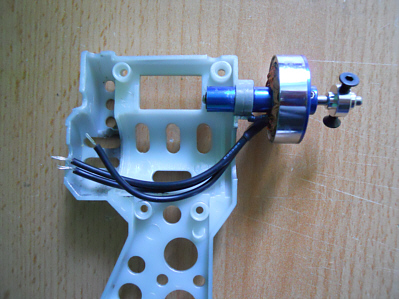 |
| Next I soldered the new speed controller to the motor. The new motor is only a fraction of the size of the old one, so where the old
motor used to be now just holds some of the wires. The old receiver was in the grey box below the pilot figure. The new receiver is much smaller than the original so it fits easily into that same box. The (short) antenna points up inside the pilot's head so it is invisible from the outside. The control wires of the speed controller plug into the Throttle channel of the receiver inside the grey box. The black wire goes to the '-' terminal of the battery connector directly and the red wire goes to the '+' terminal of the battery connector via the on/off switch. |
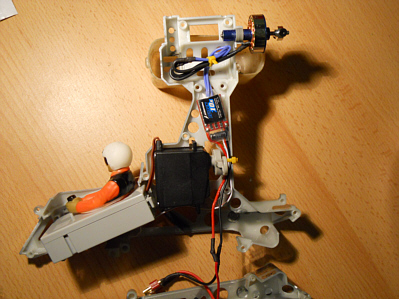 |
| The new servo is the same size as the old one... except for the point where the wires exit the servo housing (just behind the pilot's head in
the picure). No easy way out so I decided to leave those wires exposed to the outside. They are just visible in some of the pictures below, behind the
pilot's helmet. I plugged the control wires of the servo into the Aileron channel of the receiver inside the grey box. A matter of preference really, but this way throttle (up/down) is on the left stick and rudder (left/right) is on the right. The original servo arm fits on the new servo so I've reused that as it has a nice springy action designed in. |
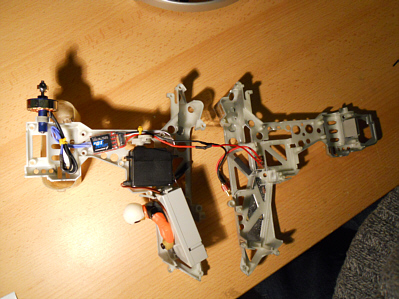 |
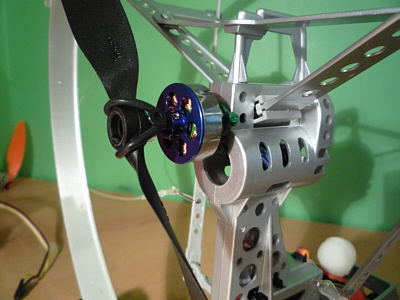
| Next it is just a matter of putting it all together again. Once the 2 halves were joined I put a tie-wrap where the motor is glued to the frame which makes that fitting a lot more rigid. That's the green bit in this picture. | 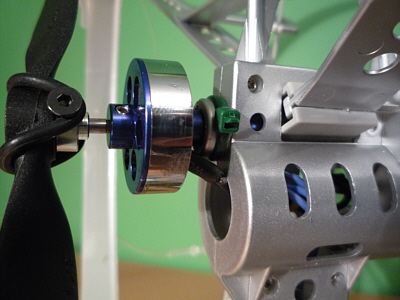 |
| This shows how the propeller is fitted to the motor. Remember this is what's called a pusher configuration so the propeller is fitted backwards
i.e. the front side of the propeller is pointing AT the motor instead of AWAY from it. It will still work if you get this wrong but you will get far
less push ('thrust') from the propeller that way. The way the new motor is fitted means that the propeller sits a bit further back compared to the original; this is no problem and is not noticable in flight. The new propeller is also smaller than the old one (but more efficient!); this is no problem either and barely noticable in flight. |
 |
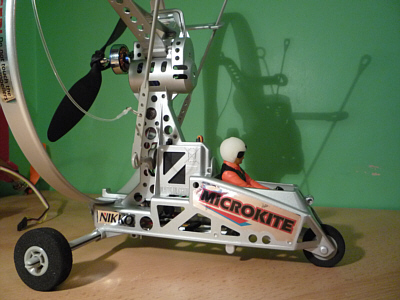
| And here it is.....with all the new bits fitted. A proper RC flying machine now ! One final tweak was to slightly shorten the plastic rod that is inserted into the parafoil (acts as a spine); I shortened it a few mm at a time until the amount of pressure on the end bits had reduced to a more reasonable level without becoming a loose fit. I removed approx 8 mm in total and it had no noticable effect on its flight. |
 |
Comments ? Suggestions ? Requests ? Email me on :
